 |
| Week 23. Overview |
 |
| Week 22. Overview for comparison |
Note: The bulkheads are made of marine plywood at this stage. A veneer of varnished teak will be applied as the finished layer.
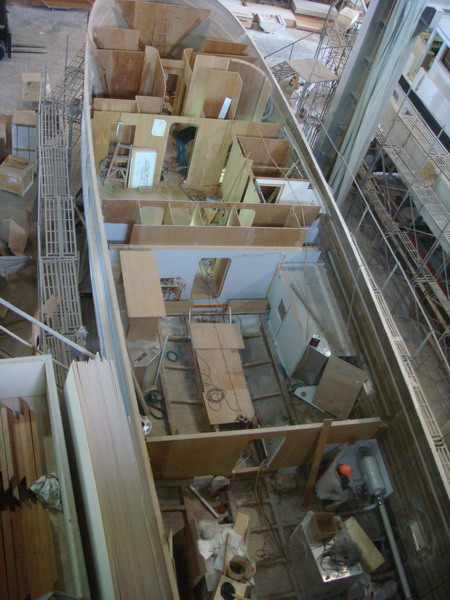
Use the 3rd stateroom as a starting point. Just forward of it is another bulkhead. That is the port side hanging locker for the VIP stateroom. Just aft and to the right is the cabinet for the washer and dryer (that are stacked one on top of the other). Just to the left of the "laundry room" is space between the bulkheads for the storage locker that is accessed through a door in the master stateroom.
Now move just to the right of the 3rd stateroom. Two door frames are visible. The one in the center is the door to the VIP. The one to the right is the door to the guest head, which is now enclosed. The bulkhead just forward of the guest head is the space for the VIP's starboard side hanging locker. Compare Week 22 to Week 23 for this area and we can see that the guest shower structure has disappeared behind the stairwell structure.
Moving aft from the guest head we can see the round bulkhead for the stairwell that leads from the pilothouse to the accommodations. Just aft of that is the structure of the locker that sits immediately across from the "laundry room." That locker has shelves for a linen closet and a drawer at the bottom for laundry detergent, etc.
Moving aft to the master stateroom and focusing on the starboard side we can see the walls for the master head just forward of the white fiberglass shower enclosure. Just to the left of the shower enclosure we can see cut outs for four doors, which are shown in the photo below. From starboard to port (i.e., left to right) we see cut-outs for the starboard side handing locker, the door to the engine room, storage locker (which will have shelves) and finally the port side hanging locker.
 |
| Week 22. Master stateroom looking aft. door cut-outs are visible. |
Explanation Note #1: Stabilizers are fins mounted beneath the waterline and emerging laterally. They are gyroscopically controlled with the capacity to change their angle of attack to counteract roll caused by wind or waves acting on the vessel. Fins work by producing lift or downforce when the vessel is in motion. Effectiveness is increased as speed increases. The photo below shows the actuator attached to the fin.

Explanatory Note #2: A chilled water air conditioning systems consist of the chiller, located in the engine room, that cools (or heats) fresh water, then pumps it through an insulated piping loop to air handlers located in the living spaces, where the air is cooled (or heated). Click below for a diagram. Chilled water A/C is an alternative to having multiple A/C units for each room as we did on the 48. The 63 would need at least 5, which would occupy considerable space in the lazarette.
http://www.dometic.com/e93e31e2-2ac4-4704-90e2-00166d9d518e.fodoc
The perspective in photo below is from the master stateroom looking forward. Here we see a worker installing steps for the stairwell. Immediately to his right is the storage locker (for linens). you can see wiring chases on the hull sides through the opening to the right of the photo.
 |
| Week 23. Master stateroom looking forward to the hallway |
 |
| Week 23. Glassed in bulkhead and chilled water system lines |
 |
| Week 23. Notice the stairwell structure sticking up on the starboard side |
Notice also the pipes at the top front of either tank. These are the upper mounts for the sight glasses that enable you to see the fuel level in each tank. The 63 will also be equipped with a fuel polishing system.
 |
| Week 23. Engine room looking forward. Note the fuel manifold system to port |
Diesel fuel contamination is a MONUMENTAL problem. There a four solutions, three of which are either lousy and expensive. Filtering the fuel is one. In this case the fuel in pumped out of the tank through a filter to remove the contamination and then pumped back into the tank. Problem: The contamination cannot be removed from the fuel lines and the contamination grows back into the tank. A friend used this solution. He paid $2,000 for the "treatment." Four months later he lost an engine while cruising. The sludge had returned. Incidentally, the sludge collects in the off-engine 20 micron filters system and 2 micron engine fuel filter. It literally looks like black sludge.
Cleaning the tanks and fuel lines is another option. In this case, the fuel is removed and the inside of the tanks is accessed through a cleaning port or, one is cut into the tank if not included as standard equipment. This is still problematic due to tank baffling, which restrict ability to get to certain areas. This option is far more expensive. Unfortunately, contamination can return if you do not get 100%. Even if you do, the problem can return if the boat is not used enough.
Replacing the entire fuel system (tanks and lines) is the most expensive option and still not fool proof if the boat sits for extended periods.
The best solution is a fuel polishing system. Essentially, this is a pump attached to the fuel manifold that continually pumps fuel through a filter system that removes water, microbes and dirt thus preventing contamination.
Side Story: It is also possible to get "bad" (contaminated) fuel from a marina, which happened to us in 2005 when we were cruising on our 1993 Sea Ray 440 Sundancer. Unbeknown to us, we took on the bad fuel in Manistee Michigan. We then proceeded to cross Lake Michigan (a 100 mile run). While crossing I noticed the RPM fluctuate, first a 50 RPM drop and then occasionally a drop of 100. The next day we cruised further south until when off Racine we saw the fluctuations increase dramatically (i.e, a 1,000 RPM). We limped into Racine where a technician confirmed fuel contamination. We replaced the Racor 20 micron filters and the engine's 2 micron fuel filters and went on our way. The tech advised us that several filter changes would be required before the problem was solved. We never found out as we traded the 440 for the 2006 Sundancer.
Returning to construction progress. Below is a photo of the engine room looking aft into the lazarette. Here you can see two rectangular holes on either side of the door. These are for the sleeves where the shafts exit the transmissions to connect with the props. Outer Reef installs Aqua Net 22 stainless steel shafts with two Tideless dripless shaft seals, one as primary and one as a back-up. This strategy enables shaft seal replacement without having to haul the boat and remove the shafts. Note the stringers just forward of the shaft holes. These are shaped with a depression for the shafts as they exit the transmission.
Also visible in this photo are the pipes for the mufflers along with the supports for the 16 KW and 12 KW generators that were installed earlier.
 |
| Week 22. Engine room looking aft |
 |
| Diagram: Engine Room and Lazarette |
 |
| Week 23. Overhead photo. Note the muffler on the starboard side |
 |
| Week 23. Primer coat has been applied |
 |
| Week 22. Hull prepared for the primer coat (for comparison). |
 |
| Week 23. Half round over master berth showing some varnished teak |
 |
| Week 22. Half round for comparison |

Needless to say, we have made considerable progress in 23 weeks.
 |
| Week 1. Workers laying-up fiberglass |
Written by Les.
No comments:
Post a Comment